How to Install a Grab Bar in a Marble Shower
For those at a higher risk for falls, a bathroom or shower can quickly become a dangerous place. To limit falls and protect your loved ones, you should have grab bars installed.
You can install a grab bar in a marble shower by assessing the stability of the marble tiles, using the correct tools, and knowing the proper way to drill into marble. You can also use suction-cup grab bars for a simpler installation process.
If slipping in the shower has become a risk for you or your loved one, a grab bar is one extra step you can take for additional safety, independence, and peace of mind. The rest of this article will teach you everything you need to know about installing grab bars in a marble shower.
What Type of Grab Bars Can You Install in a Marble Shower?
The first step to adding a grab bar (or two) to your marble shower is picking the right one. There are two options when it comes to bathroom grab bars, each with its pros and cons.
Suction Cup Grab Bars
Using suction cups to grip the marble wall, a suction cup grab bar helps you avoid breaking out the drill. This Zalik Grab Bar for Showers (available on Amazon.com) won't damage the marble walls and features an easy, toolless installation. It also comes in a pack of two, so you can install them on opposite sides of the shower for greater stability.
Pros of Suction Cup Grab Bars
- The installation is straightforward and doesn't require tools.
- You can adjust the grab bars after the initial installation.
- There is little to no risk of damage to your marble shower's walls.
Cons of Suction Cup Grab Bars
- They are less secure than screw-mounted grab bars.
- They cannot be installed over grout or other porous surfaces.
- While each brand has its own weight limit, they are made to assist with balance rather than supporting you when you slip.
Traditional Screw-Fixed Grab Bars
These are the types of grab bars you may see in public restrooms. They require you to drill into the marble and secure them with screws. This Gotega Stainless Steel Grab Bar (available on Amazon.com) has all the screws and fasteners you'll need for installation. It also has a sleek, attractive finish designed to prevent rust and comes in a two-pack.
Pros of Traditional Grab Bars
- They are the more secure of the two options for grab bars.
- You can purchase convenient kits that come with all the necessary screws.
- They are meant to last for a long time, provided they are correctly installed.
Cons of Traditional Grab Bars
- They only work if installed adequately over secure marble tiles.
- Improper installation can lead to injury.
- Installation is only possible if you have experience drilling into marble or other masonry.
Installation Steps for Traditional Grab Bars in Marble Showers
1. Assess the Condition of the Marble
Never affix your grab bar to marble tiles that are:
- Loose
- Cracked
- Old
- Unstable
Making sure that the marble tiles have been correctly installed and are still in good condition is an integral part of properly installing a grab bar, avoiding the risk of it breaking when your loved one slips.
Make sure there is enough room between the marble tiles to avoid drilling into and affixing the grab bar to the grout between the tiles. Installing the bars over grout will create a weak spot, and you'll risk it not being secure enough.
If you notice that your marble tiles are loose, you'll need to have them fixed or replaced before installing grab bars. You shouldn't use either suction cup grab bars or traditionally-mounted grab bars on loose, defective marble tile.
2. Gather the Necessary Tools and Supplies
Here's a list of a few things you'll need to install the grab bars safely:
- Safety glasses
- Painter's tape
- An electric drill with masonry drill bits
- A ruler or tape measure
- Water in a spray bottle
- Screwdriver
- Silicone caulk
- The grab bar and mounting hardware
- Wall anchors (if not drilling into studs)
3. Mark Your Drilling Locations
Hold the grab bar in the desired location and use a pencil to mark where the mounting holes will go. Use a level to ensure the bar will be straight.
Consider the user's height and needs when determining placement. Generally, grab bars should be installed 33-36 inches from the floor.
4. Prepare for Drilling
Apply painter's tape over the spots you'll drill. This serves two purposes:
- Prevents the drill bit from slipping on the smooth marble surface
- Reduces the risk of chipping or cracking the marble
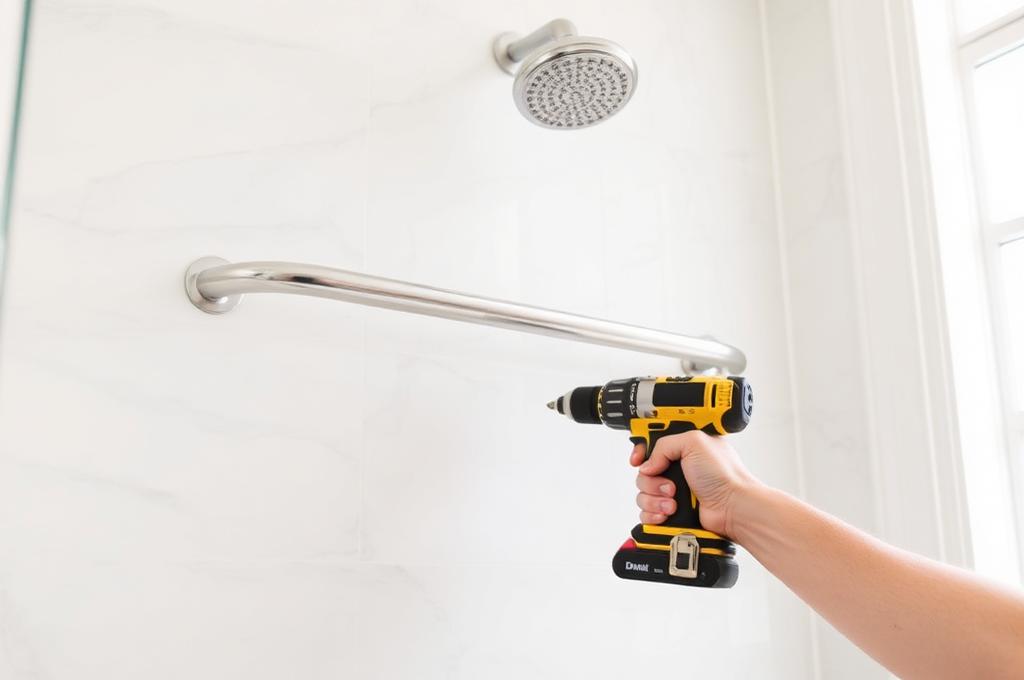
5. Drill the Holes
This is the most critical step. Drilling into marble requires care and patience:
- Start with a small pilot hole using a carbide-tipped masonry bit
- Hold the drill at a 90-degree angle to the marble
- Apply light, steady pressure—let the drill do the work
- Spray water on the drill bit periodically to keep it cool and prevent cracking
- Drill slowly to avoid damaging the marble
- Gradually increase to the full-size hole needed for your anchors or screws
Important: Never use hammer mode on your drill when working with marble. The vibration can crack the tiles.
6. Insert Anchors (if needed)
If you're not drilling into wall studs, you'll need to use wall anchors designed for use in tile or masonry. Follow the anchor manufacturer's instructions for installation.
7. Mount the Grab Bar
Line up the grab bar with the drilled holes and insert the mounting screws. Tighten them securely, but don't over-tighten, which could crack the marble.
8. Apply Caulk
Apply a small bead of silicone caulk around the base of the mounting brackets where they meet the marble. This prevents water from seeping behind the grab bar and potentially damaging the wall structure.
Smooth the caulk with a wet finger for a clean finish.
9. Allow to Cure
Let the caulk cure for at least 24 hours before using the grab bar. This ensures a secure, water-tight seal.
10. Test the Installation
Before allowing your loved one to use it, test the grab bar yourself by pulling on it firmly in multiple directions. It should feel rock-solid with no movement.
Special Considerations for Marble
Marble is a beautiful but delicate material. Keep these tips in mind:
Marble chips easily. Use painter's tape and drill slowly to minimize this risk.
Marble cracks under stress. Don't over-tighten screws or use hammer drills.
Water stains marble. Apply caulk properly to prevent water infiltration.
Marble varies in hardness. Some marble is softer and easier to drill; others are harder. Adjust your technique accordingly.
When to Hire a Professional
Consider hiring a professional if:
- You've never drilled into marble or tile before
- The marble is expensive or antique
- You're uncertain about the structural integrity of the walls
- You don't have the proper tools
- The installation requires drilling into grout lines (not recommended but sometimes necessary)
Professional installation typically costs $100-300 but provides peace of mind that the job is done correctly and safely.
Maintenance of Marble Shower Grab Bars
Once installed, maintain your grab bars by:
- Checking monthly for any loosening of the mounting screws
- Inspecting the caulk seal and reapplying if it deteriorates
- Cleaning with mild soap and water (avoid harsh chemicals that can damage marble)
- Testing the bar's stability regularly
Final Thoughts
Installing a grab bar in a marble shower requires extra care due to marble's delicate nature, but it's definitely doable with the right tools and technique. Whether you choose suction cup grab bars for easy, damage-free installation or permanent screw-mounted bars for maximum security, the important thing is adding this crucial safety feature to protect your loved one from falls.
Take your time, follow the steps carefully, and don't hesitate to call a professional if you're unsure. Your loved one's safety is worth the investment in doing it right.

About Chip Mitchell
Chip Mitchell is the founder of Growing Gray USA. With over a decade of experience owning a home care company, he has helped hundreds of families navigate the complexities of caring for aging parents.
Read full bio →